
Why is there Need to Add Admin User via MySQL Database?
In certain scenarios where traditional user management techniques are ineffective or unavailable, adding an admin user using WordPress’s database may become essential. For example, adding an admin user directly through the database offers an alternate access path to recover control over the website in the event that an administrator loses access to the WordPress dashboard because they lost their login information or their account was compromised. When traditional login techniques fail to restore access in an emergency, this technique can be vital for diagnosing problems. When making such changes, it’s crucial to proceed with caution and guarantee the security and integrity of the database.
You May need to Add Admin User via Mysql if you are locked out of your wordpress due to a hacker attack, or you simply forgot the password and don’t have access to the email used while registering as Admin.
You can follow these simple steps to get back access to wordpress dashboard.
Before Making any Changes to database. Make sure to take a backup first that will serve for restoration in case of any data loss.
-
Acess PhpMyAdmin From your Hosting Cpanel
Most of the WordPress hosting providers have pre-installed phpMyAdmin. It is located in the Databases section of the cPanel dashboard for your hosting account. Below is a attached screenshot from namecheap Cpanel Dashboard.
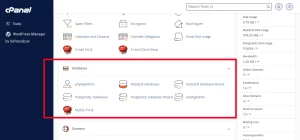
Clicking on the PhpMyadmin icon will open the phpMyAdmin interface. From there You need to find and select your WordPress database from the left column.
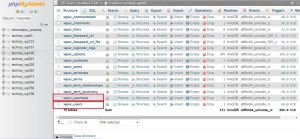
Once the database is opened the tables will be listed on the right side.
Locate the Users Table: Within the database We Will be working on wp_users and wp_usermeta. First locate the “wp_users” table. The table prefix may vary depending on your WordPress installation. Here in our case it is “wpav”
Adding User to wp_user Table
Once you click on the WP_User Table. A List of Users registered within WordPress will be displayed.
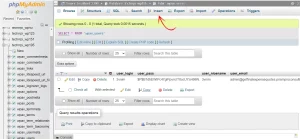
Insert New User: Click on the “Insert” option to create a new entry in the “wp_users” table.
Enter User Details: Fill in the following fields:
-
- ID: Leave this field blank or set it to auto-increment.
- user_login: Enter the desired username for the new admin user.
- user_pass: Set a secure password for the new user. It’s crucial to encrypt the password using the MD5 function.
- user_nicename: This can be the same as the username.
- user_email: Provide the email address associated with the new admin user.
- user_registered: Enter the current date and time in the format YYYY-MM-DD HH:MM:SS.
- user_status: Set this to 0 to indicate an active user account.
- display_name: Enter the display name for the new user.
Get the User ID: After inserting the new user, note down the value in the “ID” column assigned to the newly created user.
After Filling All the information. Hit The Go button for changes to be saved.
Now we need to go back to tables and open the wp_usermeta table. After that Click on Insert Tab same like the way you did for previous step.
Add the Following Data to Insert Form.
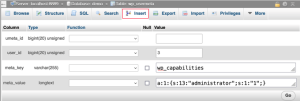
unmeta_id: leave this blank (it will be auto-generated)user_id: the user ID you used in the previous stepmeta_key: this should bewp_capabilitiesmeta_value: insert this:a:1:{s:13:"administrator";s:1:"1";}
After filling the form you will see a second form with fields like the above one. Fill it with the data as below.
unmeta_id: leave this blank (it will be auto-generated)user_id: the user ID you used in the previous stepsmeta_key: you need to enterwp_user_levelmeta_value: 10
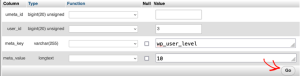
Now You have filled in Data click on Go button to save the changes. A wordpress Admin User is finally created with the details you have entered.
You Should be Able to Login to your WordPress Dashboard now with the username & password you specified for this user.
After login you need to navigate to Users » All Users, in wordpress dashboard. Click on the username of the user you created . This will open User Profile. Scroll Down to the end and save changes this will optimize the userfields and and add some extra information.
Hurray! You are Now Good to Access WordPress Dashboard as earlier.
